Thursday, March 29, 2012

Magic Card

Before I tell you about my magic card I want to share with you what my cat did this morning. I had to remind myself that I loved him so that I wouldn't kill him after I discovered it. 
I think it happened when he jumped off of the cat tower we had sitting by this outlet. He jumps on and off of it with a lot of force and it slides easy on the tile. I am not very happy about this! At least it won't be expensive to fix.

Anyway, now that I have complained a little about my cats I will share the craft project with you. This was my first attempt at a "Magic Card", it has issues so I won't be giving it to anyone but I wanted to share it with you because I love the concept so much. The main issue I have is that I don't have permanent stamp ink, so the ink is all smudged. I thought if I didn't use the acetate but used clear velum instead it would work, I was wrong. Next time I make a trip to civilization I will pop over to Hobby Lobby and pick some up. The inner workings of this card aren't perfect either, but I learned from my mistakes and I know how to make it better next time. 
Sorry about the crappy lighting and picture, like I said in the post yesterday my cat made a mess on my back drop and I didn't feel like getting my nice light out. This is what it looks like when it is closed. The picture of the birds is black and white.

But when you pull on the little tab they magically become colored. So cute right? Well, it would be if I actually used the clear acetate and permanent ink. I love this concept and I will be making another one after I get some permanent ink. Since I knew that this one wasn't going to work I didn't spend much time on it, so it could have been much better, the next one I make will be much cuter. 

If you want to learn how to make a magic card I learned HERE. I changed a few things for mine, I will make my own tutorial after I have the proper supplies. Hope you enjoyed it. As always, if you want to know what I used, how I used it, or what I think about something please feel free to ask, I would be happy to tell you!!! 


Wednesday, March 28, 2012

Ugly Plastic Drawers/ Mod Podge

Before I talk about my ugly plastic drawers, I want to show you the latest addition to my craft room. I got the most adorable Scentsy warmer. It's called Tiara and it looks absolutely perfect in my room.

Don't you just love it, I sure do! I have Cherry Almond Pie melting right now and I am thoroughly enjoying it.

Alright, now onto my plastic drawers and home made Mod Podge. I don't know if you are like me but I love cheap crafts. Mod Pogde is awesome stuff but it can get quite spendy. I saw a few blogs on how to make your own for super cheap. I grabbed a salsa bottle and emptied it into a bowl. I was using the salsa for dinner anyway, so it was perfect. I had a 72 cent bottle of glue, I poured it into the bottle. Then filled the glue bottle with water, put it in the jar, shake, shake, shake and BAM... Mod Podge. I have used it, it works.


I took the label off of the jar by soaking it in a bowl of soapy water over night, it and the glue fell right off. Then I used the Mod Podge from the bottle to put the label on. It's not the best label, but I just used scraps. Excuse the mess on my backdrop, apparently my cat thought it looked like a good place to lay, now it needs to be washed.

Another project I did with my home made Mod Podge is a plastic drawer redo. We all have ugly plastic drawers. I just got one for my paper, it's colored and super cute. Thats the one thing that I don't like about my desk, no drawers. I love the one that I just got for my paper, I don't know what I did without it!
My messy drawer looks super messy next to my cute new one. I wanted to have drawers that matched, but I didn't want to buy another one, there was nothing wrong with it. So used some scrapbook paper and made it better.
Now they match and my mess is covered. I love it so much. Now really all I need is a table for my tv and the plant that is sitting on my drawers. That plant is very special to me and I want to get it closer to the window.

I am still working on the blanket, but I am also working on some cards as well. I have to let my wrist have a break every now and then. I should be back shortly with some other projects. I have done a few things that I haven't shared with you yet. See you soon :)

Monday, March 26, 2012

iPad Cases

My husband got "the new iPad" aka the iPad 3. I got rid of my iPad a while ago, I have a Macbook Air that I love very much so I wasn't using it much. But I decided that I wanted to take over the iPad 2 rather than try to sell it. I am kind of clumsy, I have shattered three iPhones. So I wanted a case for it. I love the smart cover, I have a pink one of corse. I saw a few that claim to match the smart covers, but if the colors weren't exact I would hate it. So I got a clear cover.

I love that it works with my smart cover and protects the back without adding a lot of bulk. But its super boring, lets be honest, I don't do boring. I have seen people using scrapbook paper to jazz up clear phone covers so I figured why not just apply the same logic to my iPad cover.

I used a 12x12 scrapbook paper and an excato knife. I pushed the paper in and cut around all of the little ports and open spots. After it was all cut out I used a corner rounder to make sure that it would fit nicely, I don't round corners by hand very well.

I think it turned out quite cute. And the best part is, when I get tired of it I can just pick a new paper and do it again. I made a template out of cardstock after hubby asked me to make him one too. He got a leather case the same time I got the clear one and took it back to have a clear one like mine. Unfortunately it didn't fit his as well, the new iPad is slightly thicker, they are coming out with one that should work though, so we will see. I did take a picture of it anyway.

He loved the Air Force paper and I hope that we can make this cover actually happen for him, his iPad would match the binder cover that I made for him. I have a few other projects that I will be sharing soon, maybe even later today.

Wednesday, March 21, 2012

Easter Wreath

So this morning when I woke up the sun was shining, I was so happy that it was nice out today and not cold and windy. I decided that it would be a nice day for a run outside rather than working out indoors. So I went into my craft room (aka the most unorganized room in the world) to find my arm band for my phone. Well, long story short, I still don't know where my arm band is but my craft room and every closet in my house are all nice and clean with a place for everything. About 1/2 way through I realized that I wasn't going running so I turned it into a workout. I started doing squats, lifting things more and using my step stool a lot. I think I actually got a pretty good workout all said and done, plus now my house is more organized. It's a win win. Now onto the craft project...

I saw this super cute easter wreath on pinterest a while back and I have been meaning to make it for a while now. But every time I went to the store I would forget to buy eggs and grass. I finally remembered yesterday and I am happy that I did, it turned out super cute. The original post that the wreath was on can be found HERE. Hers looks much bigger than mine and I am in love with the ribbon that she used. I might see if I can find some cute easter ribbon when we go the civilization this weekend. We need a new coffee pot, but that is a story for another day.

I don't think a wreath could have been any cheaper. I made it for just a little more that $5. I love that it brings some color to my door. I put the extra eggs and grass in the big coffee cup that sits on my kitchen table to being a little more color and easter-ness to my kitchen. Now I want to get a new table cloth that is a solid color so that it really pops.


I am debating getting more eggs and making another wreath that is a little bigger, we will see. As for now I am going to lay on the couch in my craft room and enjoy how clean it is. I will be the first to admit that it probably won't be this way for long.

Friday, March 16, 2012

New Desk

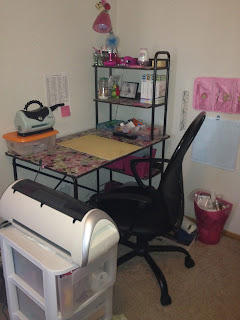
If you have been in my craft room (which isn't many people) you would know that it is kind of a mess, and I am not just referring to the half cut sheets of paper all over the floor. Since my craft room is the newest room in the house, and in our other house I didn't use it all that much, it has the least amount of furniture and a lot of hand me down/old stuff that doesn't match or really suit my needs. I have been telling my husband that I need a new desk now that I have my Cricut. Because if the Cricut is on the desk, I have to sit on the floor for everything else. I finally found a way to make it so that I didn't need to sit on the floor, but it really looked like crap. I put my Cricut on one of those plastic drawer sets and put it next to my desk. After learning that with it in line with my desk I couldn't see the screen or the key board very well and my chair doesn't move very well on carpet I discovered what I really needed was an "L" shaped desk. So I made a little redneck L with my desk and the plastic drawers. My cricut was basically in the middle of the room, it looked like crap, but it worked. Since the surface of my desk was so small, I had stuff stuck to the wall with handy tack and 3M strips so that I could still use it, but it wasn't in my way when I needed the desk space. Let me give you a visual of the mess that was my work space.


Functional, but really ugly. I loved my little desk, I spent a lot of time making it look cute, I used mod podge for the first time to put the floral fabric on it. It sure was cute. I put it up on a local for sale site and it was gone in seconds (literally) I had four people in the span of 1 minute say that they wanted it. I guess giving it away for free probably helped. I didn't feel right for charging for a desk that was so old and that I had poured glue all over. 

But on to how I got the new desk, as I said before I had been telling my husband that I needed a new desk for months. I think in his head I "wanted" a new desk and was trying to make it a "need". I had been looking at desks for a while, trying to find one that was inexpensive, but would suit my needs. I really wanted and L with drawers and a hutch, it didn't take long to discover that what I wanted was going to cost hundreds of dollars, I wasn't willing to do that. If/when we have kids, my craft room will be the room that goes away, probably taking my desk with it. Anyway, about two weeks ago my husband walked in and saw me with my laptop on the floor, a Cricut mat in my lap, I was pulling something off the wall and my project taking up the entire desk. It finally hit him that I really did need a bigger desk and gave me the go ahead to pick one out and buy it. He agreed on it not making much sense to spend a lot. He has a super nice desk that we can share if the time comes.

I found a desk I wanted from Walmart, it was cheap and would serve my needs, no drawers, but a cute little hutch. I will admit that the hutch really wouldn't benefit me much, it had one little cupboard and a shelf, but it was cheap and L shaped. On a whim I stopped into the Staples on the way home from the "mall" ( I use quotes because I don't think it should be called a mall) on Wednesday. I found a beautiful, L shaped desk, no drawers or hutch, but a cute little shelf that is better than a hutch because it's accessible from my chair. It is much deeper and much longer than the one I had picked out from Walmart, and pretty much better in every way but the color (I like darker woods). I didn't tell you the best part, it was on clearance for way under my desk budget, and even cheaper than the one from Walmart. I called hubby, called again, and again, sent him a picture asking if I can go ahead and get it. No answer, so I told the guy I would be back because I had to ask hubby before I made a big purchase. We got home at about the same time, and he asked if I bought the desk.... um, no, I was being nice and asking first. So we took my sub woofers out of my trunk, headed back to Staples, and bought the last one they had in stock.

Isn't it just perfect? There is a place for everything and I still have room to work on my projects. Plus my computer no longer has to sit on the floor. I am so in love with it all I want to do is spend time at my desk. I made my first project on it last night, a cover for my husbands work binder. It turned out really cute, I cut the Air Force symbol by hand, I am super proud of the way it turned out.

I hope you enjoyed seeing my new desk as much as I enjoy seeing it. Hopefully It won't be long before I am back to tell you about more upgrades to my craft room. I am hoping to have a fully nice space soon.

Monday, March 12, 2012

Best grilled chicken ever!

I am beginning to feel a little guilty. I am the only one out of the friends that I follow who didn't write a blog post tonight. So I deiced to go ahead and post one, even though I was about to head to bed. I want to tell you how proud of my self I was for dinner tonight. I was going to make cheesy chicken and rice in the slow cooker, got my chicken out, trimmed it down and cut the breasts in half as I always do for slow cooker chicken. Next ingredient needed was cream of chicken soup, not a problem, I have a stock pile because I use it so often. Um.... did I mention I use it often, the stock pile is gone. I ran to the shopette because they have some food items, but no luck, the commissary is closed on Mondays and by the time I went all the way into town to Walmart, found what I needed, wandered around and looked at everything under the sun (you know you do it too), waited in line, and drove back my chicken wouldn't have had time to cook for the full 7-8 hours. So this brings us to dilemma #2, I grocery shop on Tuesdays, so on Mondays the kitchen is pretty bare. I have chicken cut in strips, a lemon and some spices.... Grilled chicken!! I whipped up a marinade with just the things I had left in my kitchen, I must say that it was the best grilled chicken I have ever had. Hubby says my cooking is always good and I never stick to the recipe anyway, so he wasn't surprised that it was amazing. I will share the recipe with you to the best of my knowledge, I didn't measure anything, so these are all just guesses, feel free to add or decrease at your pleasure. I must admit that I am not just sharing this recipe for your enjoyment. I am also sharing it so that I can remember what I put in it. I usually use fresh dill in grilled chicken, I must say that I loved the rosemary though. I love fresh herbs, I miss my herb garden, I will be growing one again soon.

Amys grilled chicken

2 chicken breasts (cut in half, probably not necessary)
Salt & Pepper to taste (my to taste is more pepper and way less salt)
2 tablespoons of olive oil
2 teaspoons of white wine vinager
1/2 lemon worth of zest
1/2 lemon worth of juice (it probably would be better with more, but I only had one lemon and needed the rest for the rice)
1/2 tablespoon fresh rosemary, chopped finely
1 teaspoon dill weed
1 teaspoon oregeno
1 freaking huge garlic clove (had it not been a mutant garlic clove, I would have used 2-3)

Mix it all up in a gallon size bag and let it refrigerate for a few hours. When you go out to light the grill to let it warm up take the chicken out of the fridge so it can warm up slightly, it grills better this way. Grill for 10-12 minutes, or until done, turning once.

I served this with lemon rice, it's a staple in our house, I make it probably 2-3 times per week, could be why I almost always have lemons on hand. This was a recipe that my mom gave me years ago, I have changed it a little and I haven't looked at the recipe in a long long time. Super simple recipe as follows...

I use minute rice, so I follow the recipe on the box, I change the water for chicken broth and the juice of one lemon, I also add in lemon pepper and italian seasoning, I don't measure, I just sprinkle it into the pan until it looks good, I don't skimp on the spices. Bring everything to a boil, stir in the rice, let it sit for 5 minutes and enjoy, I don't think it can be any easier.

If you make the chicken let me know, if you change anything tell me how it turns out. This is one recipe you defiantly don't have to follow exactly to make it taste good.

I didn't know that I was going to be blogging about this because I didn't know it was going to be so worthy of one, so next time I make it I will take a picture and add it to this post so you can see how delicious it looks1


UPDATE: 

Made the chicken again, today (St. Paddy's day). It was just as delicious as the first, a little different since I don't measure, but still amazing. Anyway, I took a picture this time. It's kind of a boring picture, but you can see the deliciousness!!

Thursday, March 8, 2012

Peeling Garlic

A few months ago a saw a video that changed my life in the kitchen, literally! I don't know about your house but in this house we love garlic. But I hate, loathe, and despise (feel free to add any other words that fit) peeling garlic. It starts to get sticky and the smell lingers on your fingers for hours. The problem is that fresh garlic is so much better than the stuff in the jar (even though I keep a jar of garlic for days I am feeling really lazy). The video I saw was how to peel an entire head of garlic in seconds. Well, it's just me and my hubby that I cook for most nights so using an entire head of garlic in one meal might be a bit much, even though we love garlic. In the video he breaks up the garlic by smashing it with his palm, puts it in two big metal mixing bowls and shakes the crap out of it. I don't have two metal mixing bowls and I think that would be a bit over kill for my needs, so this is how I do it.

 For this particular recipe I needed three cloves. So I popped them off of the head.

 Put them into a small glass with any extra papers that are laying on the counter (only because I usually take out the garlic and dump the rest right into the trash)

 Take another small glass and put them together so that the open sides line up. Hold onto it tightly with your palm along the line and two fingers on each glass (or how ever is comfortable for you that you won't drop one). Then shake the dickens out of it for a few seconds making sure that it is banging on the bottom of both glasses.

And voila, peeled garlic in seconds. I usually take a knife and cut off the end that was attached because it's not pretty and doesn't look edible then it's ready to use. Pretty nifty huh? I hope that you get as much use out of this little trick as I do. If you would like to see the original video you can see it HERE.

Thanks for reading and I will be back soon with more awesome tips, maybe more from the kitchen. I have been ignoring one of my favorite parts of life on this blog. I love cooking!

Wednesday, March 7, 2012

Sunflowers

Before I tell you about my sunflower project I want to tell you about my cookie disaster that happened this morning. Since it is mustache march (which I hate for the most part) I got mustache cookie cutters and found a recipe for chocolate sugar cookies. I spent the better part of the morning making dough, letting it chill, rolling, cutting and stamping the cookies. When the first batch came out of the oven I was so excited I could barely stand it, they were so cute! Then I realized that they were hard as a rock. I figured I rolled the dough to thin so it got over cooked. So I made another pan full, rolled double the thickness of the first ones. Still hockey puck hard. So I gave up and tossed the rest of the dough. I think that I am going to make regular sugar cookies, I have an amazing recipe that I have made many many times and they always turn out amazing. They won't be brown (which is why I wanted the chocolate ones) but they will taste good. And in a cookie, thats what matters the most!

I have a friend that loves sunflowers. Her kitchen is sunflowers like my kitchen is coffee. So when I saw this pattern for sunflower dishcloths on pinterest I had to make them for her. I thought of her instantly. I had originally planned to make them for her for Christmas but I ran out of time. And you know that I can't just crochet something for someone, I have to make a cute card that matches. I am not going to lie, I am not the biggest fan of the card I made. I am apparently not good at making sunflowers, I am obsessed with the blue and green paper though.


As always., if you are wondering how I did something, what I used or any combination please feel free to ask! I would love to share. You can find the pattern for the sunflowers HERE.

I am working on a baby blanket at the moment. Since it's a bigger project it will be a bit before it's finished. I am about 1/3 finished with the blanket then I am going to put a border on it and I am thinking about making matching booties. The booties will depend on how long the blanket takes. I would like to get it to the mom-to-be before or close to the baby shower.

I will have a lot of time to crochet over the next little while though. Hubby is taking two classes (he usually only takes one at a time) and his scheduled shifted so he goes to bed early. Add to that the fact that Mass effect 3 came out yesterday and he ordered the iPad 3 today that he will have later this month. I might as well not exist :) It's "Mustache March" anyway, I have threatened to not kiss him until he agrees to "shave the ferret off his face". :)

Going to head off and make dinner, trying a new grilled chicken tonight. It's been marinating for a few hours now and if it tastes as good as the marinade smelled I might be sharing the recipe with you :)