Wednesday, May 30, 2012

Menu Board

So forever and a year ago (ok, so it was a few months) I made a little menu board for my kitchen to keep track of what meals we are having what day. I made it out of a frame that I had sitting in my closet. It was one of my first Cricut projects. I was getting a little frustrated because I didn't have enough room to write down all of the meal details (the main dish, the side dish and what vegi we are having) and I am very forgetful.

This is the fist version of the menu. It was the only thing in my house that is shiny sliver so it really didn't match. The brown swirly paper matched perfectly though.


I used the same swirly brown paper and added a cute coffee cup in the colors of my kitchen. I used a document frame to give me the most amount of room possible so that I can keep track of all of the parts of the meal.


The words across the top are a little crooked. I am going to say that it gives it character even though it is driving my "symmetrical brain" as I call it (or OCD as Josh calls is) crazy so I will have to fix it later. But because it'c glued on I will have to redo the entire thing and I just wasn't in the mood for that at them moment.

It matches my coffee kitchen really well and the frame fits perfectly on the little wall above our water cooler. I was actually a little worried that it wasn't going to fit when I first brought it home.


I love my little menu board. I love that it has a place to put all of the elements of the meal as well. I am trying to make an effort to make a vegetable at every meal. We eat quite well though. Mostly chicken with 1 fish, 1 red meat, and one meatless meal per week. I love the idea of "Meatless Monday", although ours is rarely on Monday. Today is slow cooked stuffed peppers, they sounds AMAZING. It's new so we shall see. 

I am debating on a saying to put in my kitchen on the wall. Something coffee related obviously. I am not sure what I want it to say yet. When I decide and get it up I will be sure to share. 


Monday, May 28, 2012

Kitchen Drawers

As many of you know, I hate my kitchen. The person who designed the cabinets in my kitchen was a man who had never been in a kitchen in his entire life. Not only is it a bad design it's tiny. My laundry room is huge though. I don't know why they didn't make the laundry room smaller and the kitchen bigger. Oh well, I am trying to make the best of it. I think the worst part of my kitchen is the drawers. I have very few of them and they are only 6 inches wide on the inside. I know what you're thinking, "6 inches? Thats ridiculous, you're exaggerating, no one would build a 6 inch wide kitchen drawer. It would be useless!"


Now that you know I'm not exaggerating I know what you're thinking "That is really stupid! Where do you put your silverware?" Up until recently I had it on a shelf in my pantry. Which is also where my pans and appliances are since I don't have a cabinet for them and my food is shoved into one little lazy suzan, my cook books, baggies, tin foil, etc is all in the laundry room. I know you're jealous of my awesome kitchen situation.

I got so sick of my silverware being in the freaking pantry (which is more in the hallway than the kitchen) I decided I had to come up with a solution. I searched all over the internet for a small silverware organizer, I can't be the only one with stupid drawers, right? Well, I found a custom one that I could order, but it was a little spendy for what it was. But that got me thinking more on the lines of making one rather than buying one. So that brings us to version 1.0, or I guess technically version 1.5 since I had to recut the notches so my knives would fit.

I made it out of a card board box and covered it with contact paper so no one (ok so that I) wouldn't get card board cuts when trying to get a fork. It got the job done but not very well. It was very flimsy and the knives bent it and would slide under when we opened and closed the drawer. But it got the ball rolling.

I was out cleaning my garage since I actually have stuff out there now (which I HATE, but there is space for it and my car) since I don't have any storage space in the house. I still had a book self sitting out there that the movers broke. When I saw that I had 5 of the backs for the book shelves, they were cheap) it gave me the idea for version 2.0. This material was less flimsy and much thinner.


SUCCESS. My silverware now sits neatly in my drawer. It's not pretty so there may be a version 2.5 :) One of the biggest problems with the first one is that it slid around and the long pieces would move with very little pressure, it also lifted up really easy so the knives would escape from their home. I found a solution for both.

In the front, since you can see it, I opted for clear bumpers. It keeps them from moving side to side.

In the back, since you can't see it unless you stand funny like I did to take the picture, I used a little bit of masking tape. Which keeps it from moving up and down (and side to side really). 

It has been a few weeks and it's still working perfectly. I think I may take it out and put the contact paper on it to make it a little more pretty and cleanable, if this gets dirty I would really be able to clean it off. 

 I am very proud of my little organizer. I hope you enjoyed reading about it. Talk to you soon :) 

Friday, May 25, 2012

Baby "Z"

Last Sunday I got to experience my first eclipse. We were just outside the viewing area so we didn't get the full "ring of fire" but it was still pretty awesome. I am very thankful that our neighbors had a welding mask that they were willing to share so we got to actually see it happening. I tried to take pictures but none of them turned out, they just look like glowing green blobs, not the awesome eclipse that we saw. I did get this picture though. It shows how odd it looked outside, the sun is bright and shining but the shadows are short and it was darker than it should have been. This picture was taken at almost the full eclipse (well, as full as we got here). It was a really cool experience and I got to meet some neighbors who were really cool as well. 

A few days ago I was a little bored so I decided to do some nail art on my toes. I saw cows on Pinterest and thought they were adorable so I now have "Moo Cow" nails. They are a little messy since I was just playing around but they are still adorable. 


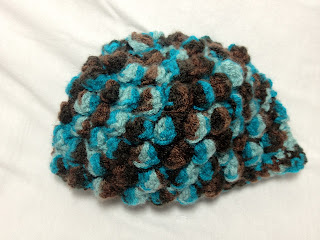
It seems like it's baby season right now. Every one I know is having babies. I usually try and make some sort of baby item for all of my friends that have a baby but right now there are so many I wouldn't be able to sleep, eat, or do anything else for that matter. I would have to be a baby item making machine. So if you get left out I apologize, I am doing my best. A co-worker of my husbands that I simply adore is having a little baby boy. I found it a little more challenging to make things for a boy as most hand made baby items are apparently for a girl. I really wanted to make her a blanket but with the skin issue on my fingers I wasn't able to. So he got some adorable booties and a little hat. I am super pleased with the way the card turned out as well.

The booties were interesting to make, I had never made booties flat then sew them together. It was a quite efficient way to make them though. I used THIS pattern for the booties and "I love this yarn" in Seascape Multi from Hobby Lobby

I fell in love with this little hat when I saw the pattern. I was happy that I found one that was good for a little boy too. No bows or flowers. I used THIS pattern and the same yarn.


I love this little card. I think it is one of my favorites so far! I got the idea HERE but made it a boy card. I knew that I wanted to do ducks before I found the card so I opted for this cute little ducky from Cricut Craft Room Basics that came with the program. He has a little rhinestone eye as well. I embossed the white cardstock behind the duck to give it a little more texture.


Well. I think thats all I have to talk about for now. I am sure that I will be back before to long. Fathers day is coming up and I have many ideas running through my head. As always, if you want to know more information on what I used, how I did it, or anything else please ask! Thanks for reading!

Tuesday, May 22, 2012

Vegas/Mothers Day

Holy cow, I didn't realize that it had been almost a month since I had written anything. I am going to talk about both our anniversary trip to Las Vegas and the Mothers Day cards that I made for the moms. I know that if I only tell you about one the other will get forgotten, I have quite a few projects that I never talked about because I waited to long then found newer exciting stuff to talk about. Since it has been so long, and I have so much to talk about this blog will probably be super long, just a warning.

On our first anniversary hubby surprised me with a trip to Lake Las Vegas. The hotel we stayed at was absolutely beautiful, big gorgeous fountains, tons of palm trees, and many fire places to hang out by. We loved the relaxed feel and enjoyed just spending time together. So after that we decided to make it an annual thing, no matter where the military takes us. We went back the next year and enjoyed it just as much. When I started looking into it for this year it was going to be a much bigger trip since we no longer live a short drive from the hotel. I looked at the hotel website to get ideas of how much the trip was going to cost, but didn't book it just yet. Went back a week later after going over all the details with hubby and we had decided what we were going to do. Went to book the hotel and the website was gone. When we called we found out that our hotel had been bought and that they would be closed for renovations during our anniversary. I was so upset that we couldn't go back to our special place! I'm not going to lie, it took me a few days to get over it and start making a new plan. We decided that we would get a room at the Luxor since thats where we stayed on our wedding night.

The Luxor was amazing. We got an awesome package that allowed us to skip the long check in line, tickets to Bodies, Titanic, and Chris Angel (we didn't go see him), all day passes to the buffet and free drinks at all the bars in the hotel. It had a few other perks that we didn't take advantage of, they were for the night clubs, not really our seen.

We spent one whole day shopping. It was amazing. We both got new clothes, hubby got a new watch and I got some new coach stuff, including my flip flops that I am obsessed with!


Since we are on the subject of shoes, and thats not far off from toes, take a look at my "Vegas Toes" I did playing cards and dice. I thought they turned out super cute. 

Now onto the stuff that if you read my blog you really care about, the craft projects. The card I made for my husband for our anniversary turned out amazing, well I think it did anyway. 


I used Planton Schoolbook for the mountains, Wild Card for the branch, the Stampin Up Owl for the owls and scalloped scissors for the different shades in the sunset. I am very proud of the way it turned out, I think it is one of my favorites so far! This is actually the background on my phone right now. 

Now, since our anniversary is right by Mothers Day I took my moms card to Vegas with us so that I could give it to her in person. So much better that way. I didn't realize until just now that I didn't take a picture of it (I was really bad about that with mom cards) so all I have is a picture of the paper dress that I put on it. I will ask her to send me pictures and I will add them after I get them. 


For hubbys mom I made a super cute blue and purple argyle card. It was a little subdued in color and I really liked it. As I was looking through my paper to find an envelope for my super cute card I came across this... 


I promptly threw the blue version in the recycling and started over. I HAD to make one that matched this paper, I think I had a slight, temporary obsession with this piece of paper. Like I said before, I was bad about taking pictures of mom cards. I did notice that I didn't take pictures of this card and asked her to email me some. The colors are a little off in the pictures, the picture above is more true to color. The pink on the card is glitter cardstock, but we all know that the glitter never shows up in pictures, trust me, it is sparkly!  


I used Wild Card for the entire thing and added some pearls just for fun. I had a blast making both mothers day cards and they both turned out amazing. 

I made a cute card, booties, and a hat for a friends baby shower that was this past weekend but I think this blog is plenty long enough so I will tell you all about that another day. As for now you know the drill, if you have questions about how I did something, what I used to do it, why I did it, or any other questions please feel free to ask.

P.S. If you read this entire thing you are my hero!