Tuesday, September 25, 2012

More cards

Well, I promised that I would keep you up to date on my Etsy shop but so far there is nothing to keep you up to date on. I haven't sold anything yet. I still have hope that it will be a success though. I have a few more items in the works that I will be putting up shortly, hopefully that will kick start things. If you would like to check out the store it is HERE or you can like the shop on FB HERE.

I have made a few cards that I haven't shared with you yet so I thought I would do that today since I am procrastinating cleaning out my craft room because I am afraid I may never come out.

A thank you card for my mama because she went to Michael's and sent me some stuff since they don't do online ordering.

Happy anniversary to my parents!!

A thank you to my friend Sara for watching our monsters while we were out of town.

And Happy Birthday to my sister in law who loves blue!

Thursday, September 13, 2012

Pink Pearl Crafts

Well, yesterday was the day. I opened my Etsy shop. I am not expecting it to explode and be popular quickly. So for the moment it is just an exciting waiting game to see when the first item will sell and what it is. I have decided not to spend any more money or make any more items until at least one sells. My attempt at not being a huge failure. These are the first few items listed, all are sold separately (other than the pink camo hat and and booties).

Crochet baby items...

Cricut Expression covers...

You can find my shop by clicking HERE. You can also like the shop on Facebook for more updates by clicking HERE then clicking the "like" button. I am sure that I will keep y'all up to date on how the shop goes and I will continue to talk about the crafts that I make for me and for gifts as well.

We went on a trip to Florida/Disney World/ Sea World last week, I will be back to talk about that once I go through all of the pictures and figure out which ones I want to post. We took hundreds!!

I am thinking of changing the name of the blog to go with the Etsy shop. If I do that I will be sure to give you lots of notice so that you can continue to enjoy my crafts and all around awesomeness. Thanks for reading!!

Tuesday, August 28, 2012

Cricut Covers

I made a cover for my Cricut machine, it is super cute and I love it! I actually enjoyed making it. My friend offered to pay me to make one for her so it got me thinking, I really should sell my projects. So I have an Etsy shop in the works. I need to get some projects made to get started with but I am really excited about it. I think that I could do well with it and it would keep me busy until we live somewhere with a salon I want to work in again. I love working on crafts anyway, why not make a profit doing it. 

Anyway, I want to share the covers that I made with you. 

First, the one I made for myself. I love the bright cheery fabric and the fact that the buttons match almost perfectly. 


I put a pocket on the back of mine to hold my USB cable that I hook to my computer with. It turns out that with the cord in it it's too heavy and falls off. I push it against the wall and it works just fine. Kind of redneck, but everything in my craft room is.


This is the one that I made for my friend. She requested pink, a little sparkle, and a "C". I think I did just that. It turned out really cute.

Another friend of mine asked me to make a cover for her silhouette. It looks a little strange because it is on my Cricut, which it doesn't quite fit. I think it turned out really cute though. She says it makes her happy every time she walks past it, which in turn makes me happy! I love when my projects bring joy to people. 


I made a few cute cards lately too but I will share them with you another time. This is all I have the motivation to share at the moment. It's not that late and I am getting tired, I really am an old lady. I will be sure to let you all know if I get an Etsy shop up and running. 

Tuesday, August 21, 2012

Craft Bag and Hook Case

So, I am terrible at this blog thing. So glad that I never said how often I would post. I have a few things that I have done since I posted last. But the one I decided to talk to you about is my new craft bag and the hook case I made to match.

The bag is fabulous. I am so in love with it. In fact I think the afghan I am woking on may be to big of a project for my bag but I love it to much to go back to my big bag. You can find the pattern HERE.


I made a fabric liner to go in it so that things wouldn't fall through.I am particularity proud of my scissor pocket and pocket for my ergonomic crochet hook.

My new cute bag all finished with my newest project (minus the actual project and the purple).

I also made a cute little hook case to match. It holds everything I need. I make it to match my bag.  You can find the pattern HERE

I changed the front cover a little to match the bag a little better, I simply substituted a row of cross stitches for two rows of singles. I have had the pink rhinestone button for a long time, I am so excited that I found something to use it on.

 If you look close the fabric I used for my liner is under the front cover of the case.

I love how well they match! It makes me happy.

I made a few dust covers for the Cricut machine that I will share with you in the future, I also made a few little changes to my craft room (which I think I mentioned before). As for now, I will end with a sneak preview of my new afghan that I just started.

Thursday, August 9, 2012

Baby Z Arrives

My friend had her baby. And he is the tiniest, cutest, most precious little boy ever. I am pretty much in love with him. I had a few more little things to give to him when he was born and I will share them with you now.

I think this may be one of the funniest projects that I have ever made, it's a pro-breast feeding hat. I will agree that it is a little silly how offended people are by breast feeding. I got the pattern HERE.


The next thing I made was these adorable little lion booties. One of the cutest pairs booties that I have made to date. I got the pattern for these HERE. I broke my rule and payed for a pattern, but it was very well worth it. It was written well and they turned out adorable. I am not a huge fan of the face on one of them, I even took it apart and tried to fix it. Oh well, I guess thats the character of hand made items. 


I saw a picture on pinterest of a baby with a mustache pacifier and about died laughing, so I put these together real quick for her. It was super easy since I have the Mustaches & Glasses digital cartridge. The original post is HERE

I of course had to make a cute card to go with all of this adorable baby stuff. I combined a few different cards that I saw to create this one. Since I am kind of a sentimental person I saved some ribbon from her shower and used it to create the bow. I am not sure that she noticed but it made me happy. 


Since this card kind of had a lot going on and is rather large it was going to be difficult to make an envelope for so I just made a little pocket in the wrapping and stuck the card there. 


Thats all I have for baby Z (for now). But I do have one other thing that I would like to share with you. Ever since I saw a picture of a kitten wearing a bow tie I have been obsessed with getting one for Max. I found a pattern on pinterest for a crochet little boy bow tie. PERFECT. The pattern can be found HERE

He looks so adorable in his bow tie and now I love him even more.

Thats all I have to share for now. I just finished a crochet tote/project bag but I want to sew a liner for it before I show you. I think I am going to make a case for my hooks that matches as well so I may do that and show it to you at the same time. I also have a few cards to share after they are delivered. So see you then :)

Sunday, July 29, 2012

iPad/ iPhone case

Hello readers (all 2 of you), a while back I showed you a template I made to cut paper for my clear iPad case. I was so excited that I could change it all the time and never get bored with it. The truth is that I never changed it, not once. It was such a huge pain to cut out all of the little pieces. I loved the idea of it though so I decided to try it out with my phone and see if it was easier. I got a bumper case with a clear back, it's white so it matches my phone. I got it home and found that this one was going to be really easy. But then I figured I could make it even easier and have my Cricut cut it for me. I played around with cricut craft room for a while, it took 8 attempts to get it perfect. It won't round the corners correctly so I do that with my corner rounder. Other than that it's a square with a rounded square cut out in it.

This is the new phone case and the old iPad case. I think the phone turned out really good.

I have an obsession, I think I change it every other day (it is currently cupcakes). It's nice because I don't get bored with it as easy (notice they are all pink? Oops.).

Now, after I got my phone all hooked up, I thought why not try and do that with my iPad. This one took much longer and was a pain. But I got it to work. I am quite proud that I made this work, it still needs a few small adjustments, but it's almost perfect. I have to round the corners of this one with the corner rounder too.


Now if I want I can have a matching phone and iPad cover.

Thats all I have for now. I do have one more finished project to share with you, one that is waiting on a little boy to make his arrival, and a few in progress.

Sunday, July 22, 2012

TP Art

After years of talking about it (yup, I had this idea LONG before pinterest was around) I finally finished a toilet paper roll project. This was the third time that I saved rolls, the other two times I got sick of waiting and threw them away. I have seen many tutorials on how to achieve TP roll art and many different shapes that you can make. I decided to go with 4 point flowers that make circles when connected. I will show you what I did but first I have a little rant.

I went to Hobby Lobby this past Friday and right as I walk in the door I saw this...
Thats right people, they have started setting Christmas displays. Um..... IT'S FREAKING JULY. I find this absolutely ridiculous!!! I get upset when they set Christmas in October. I don't think that there should be anything Christmas related until after Thanksgiving (my favorite holiday), preferably not until December 1st. I tell my friends that I am Scrooge until December. Now that I have complained about that, back to the project.

First I marked both sides of the roll at 1/2 in, which gave me 8 petals plus a little extra (which I threw away).

Then after I had all of my petals cut I started on my flowers. I used regular school glue. I have seen many different types of clips used, cloths pins seem to be popular. I have a ton of pin curl and roller clips so that is what I used. 


After they dried I took the clips off and glued them all together 6x6, putting the clips in the new glue spots.

Time for paint!! I decided to go with black spray paint. It took 1 can per piece (so 2). It sill isn't completely covered but it's good enough. If I do it again I will try using paint and a brush.

The finished projects on my wall. I think they look pretty dang good. They don't look like TP rolls thats for sure.

Close up of the finished project.

I acquired a battle wound while hanging one of these. I was standing on the couch to hang one of them. When I stepped off the couch I landed on my inhaler. I have no idea why my inhaler was on the floor (I blame mu husbands cat). Now I have a huge swollen spot that is super tender. I thought that it was going to bruise but it hasn't started changing colors yet so maybe not. Either way it hurts like hell.

I have a few other projects still, one that SHOULD be done soon, but every time I say that something crazy happens. As well as a crochet project that I am working on. Thanks for reading, talk to you soon!!

Friday, July 20, 2012

Catsup

So, I have been terrible with writing here. I have been continuing to do craft projects so I have lots to share. I am going to use this post to show all of the stuff that I have done lately and I will type a little tidbit about each thing. If you want to know more please ask me, I am always happy to share about my craft projects.

So since I am going to put a bunch of stuff in one blog I am going to go back to some stuff that I skipped as well. First up, my brothers birthday, this happened in March and I just skipped over talking about it. For Christmas my brother got what I think is called a duck blind, I call it a fort. So I made him this sign for his "fort". It's paper, craft wood and mod podge, pretty basic. I think he said he was going to hang it in his garage, I don't really know what he ended up doing with it.

The card to go with it, I don't really have much to say about the card. It's blue, it has fish on it....

The next skipped project is my dads birthday. I made him a super cute Angry Birds card. I found the idea HERE. Instead of putting them all on a card I decided to make a round card and just make the red bird. I don't have many punches, I needed them bigger anyway, so I just cut shapes on my Cricut, then followed what she did.

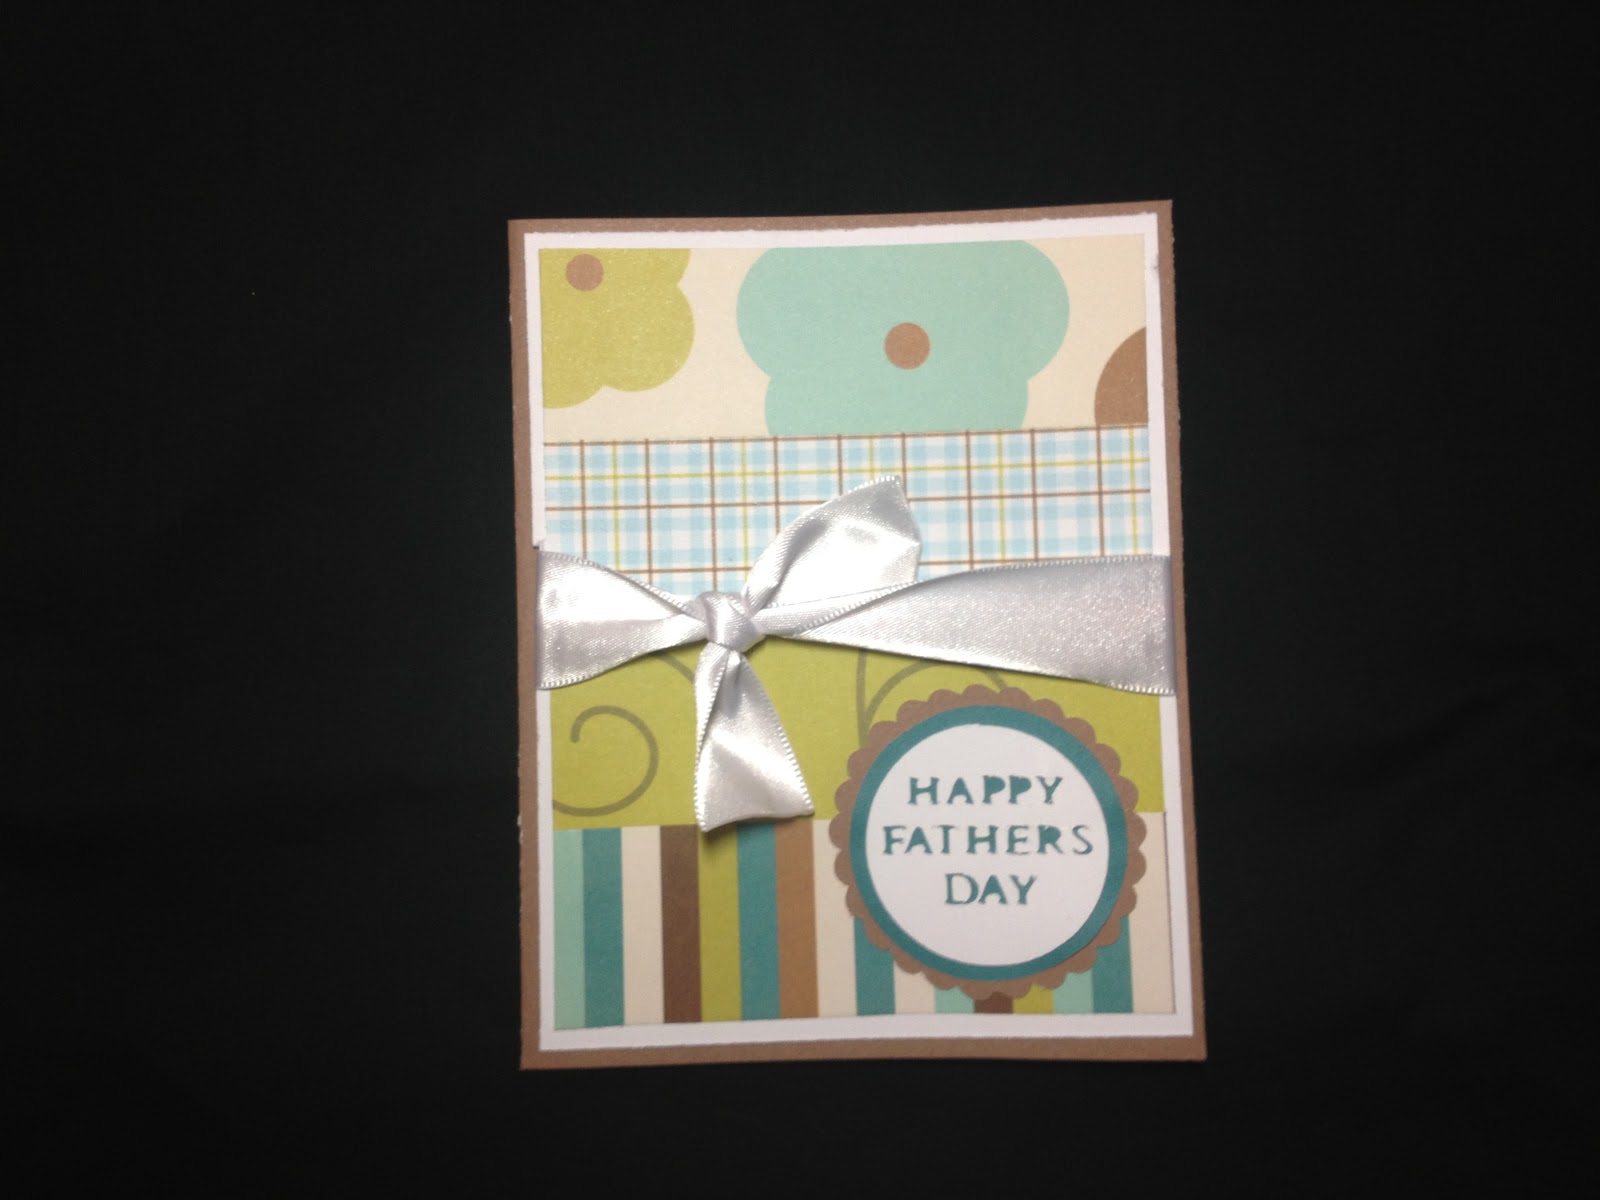
I think that catches me up on skipped projects so now onto things that I just haven't shared with you yet. Up first... Fathers Day.

This one was for my step dad. The quote reads "Any man can be a father but it takes a real man to be a dad". It's fitting for us. I stamped the quote with individual letters, cut the paper by hand and the red is shiny ribbon.

This was for hubbys step dad. It was paper scraps and I cut the sentiment with my cricut.

This one was for hubbys dad. It was actually being mailed (not in a box) so it doesn't have any embellishments. The quote is what mattered most on this card "Small boys become big men through the influence of big men who care about small boys". It is one of the more simple and "boring" cards that I have made, I am not really a fan but I was attempting to "kiss" (Keep It Simple Stupid).

The card that I made for Joshs mom for her birthday is one of my favorites that I have ever made. I combined two of my loves, crochet and cards. I got the idea from a headband display, I thought it would make an adorable card. I made the flower out of embroidery floss so that it wouldn't be huge.


 I used a really old flower punch that I have had since the beginning of time and striped paper that came in the same pack as the paper used on the card and envelope so that they would be matching colors.

I made my first vinyl wall hanging. It is in my kitchen so it of course has a coffee theme. I am very pleased with the way that it tuned out. I have a few more vinyl ideas now, I will share with you if/when I finish them.

The last one that I want to share today it a wedding card for my friend Laura. I knew that I wanted to use the owl punch but figuring out what I wanted to do with it was a little hard. Then I saw that someone made a little wedding dress for one and I instantly knew what I wanted to do. He wore his blues so I spent the time to make little tiny dress blues for the owl, I don't think I have ever spent that much time on something so little but I am freaking proud of how it turned out.

Her colors were yellow and blue, so that is why the owls are yellow :)
 Close up of my bride and groom owls. I am very proud of them.

 I loved this rub on and I was thrilled that it just happened to be blue.

Well... That catches us up. I have not been wanting to post because I was so far behind. Hopefully now that I am all caught up I will have the want to talk about my projects again. I have quite a few that are in the final stages of being complete and a few that are waiting to be delivered. I hope to talk to you again soon! Thanks for reading.